Monday, February 22, 2016

ADDIE Week 1: Analysis

For this first week of the ADDIE series, I will be talking about the A in ADDIE: Analysis. It probably goes without saying, but before you make a tutorial or any kind of instruction, it is best to think through what you will be making and why. In this phase, you should think about your learning goals, the target students or group, and where the tutorial will be embedded or used. Some instructional designers suggest conducting an in-depth learner analysis, which can include doing interviews, surveys and a background study. For most academic librarians, it is clear that you will be teaching information literacy to undergraduate and graduate students, so it is not as critical to do this legwork. It does help to have done it once or twice if you are new to an institution or to the field of study you are serving. And let's be realistic--you may differentiate the instruction you are providing to a freshman English composition class versus a capstone Engineering class. You may also want to think about what tools you have at your disposal this point in the process, as well as the time it will take you to learn the software. You can make a timeline for your project during the Analysis phase, too.

Here are some examples of things you might come up with during the Analysis phase and examples of them. Instead of using an information literacy skills example, I am going to use the example of training new graduate student workers to work at the RIS desk. I will focus on just one aspect of this training: using the printer/scanner/copier in the workroom. In this case, I will pretend I am making a training binder with step-by-step instructions, not a video.

Learner Analysis

Without doing an in-depth analysis, I can think about what I do know about my learners. I know that my learners are graduate students, that they work approximately 12 hours a week on the desk, and that they are concerned about getting some homework done while on the desk. They often work without direct supervision on nights and weekends. Since I was part of the hiring process, I can say that 2 have experience working in an office prior to coming to the library and the others do not. I also know their majors. This information tells me that they are going to be motivated, but they may also not remember how to use the copier when it comes time to use it, and that I may not be there to show them what to do. From this analysis, I have decided to create a pamphlet with images on it so they can follow along with my instructions when I am not available to help. This is another part of the Analysis phase--determining the best course of instruction for the instructional problem.

Instructional Goal

You will want to craft an instructional goal that the instruction hopes to solve. Here is an example of an instructional goal:


As part of their office skills training, Graduate Assistants will complete the process of collating and stapling a copied document using the Toshiba e-Studio 356 copier in the Research and Instructional Services Workroom.


Performance Objectives

You may want to think through what success would look like if the learners complete the goal. Here are some sample objectives related to the graduate student example:


Objective 1: Graduate Assistants should be able to define the terms collate and staple in relation to copying and explain the use of collation and stapling documents without error.
Objective 2: With the use of the training pamphlet, Graduate Assistants should demonstrate the use of the touch panel and options on the Toshiba copier to collate and staple a photocopied document.
Sub-objective 2a: Using the graphic on page 3 of the training pamphlet as a guide, Graduate Assistants should be able to identify the location of the collate option on the Toshiba touch control panel and set the collate option to Rotate Collate.
Sub-objective 2b: Using the graphic on page 4 of the training pamphlet as a guide, Graduate Assistants should be able to identify the location of the staple option on the touch control panel and set this option to staple 1 staple in the upper left of the copied document.


Project Needs and Timeline

Another thing to think through in the Analysis phase is how long it will take to create the tutorial. In this case, I can create this instruction in about 3 hours using a still image camera and Microsoft Word. I know how to do this already, so the instruction will not take long to create. In the case of a video, you may have to learn to use Camtasia or a video editing suite. You may have to get that software installed on your computer from an IT department. Think through what you will need to do before you get started.

Many times, I find myself underestimating the Analysis phase, but as you can see, if you start out with a strong analysis of your needs and your learners' needs, you will have fewer surprises later.

Join me next week for a breakdown of the Design phase!

Monday, February 15, 2016

ADDIE for Librarians

I have had this idea for a while to put together some library training or MOOCs. One of my ideas is to do the LibGuides Summer Project (see last week's post) for a larger audience of librarians at other institutions. The other idea that I have been kicking around with a few people was for an ADDIE online workshop or MOOC where people complete an entire tutorial or instructional design project over the course of 6 weeks over a summer. If you are not familiar with it, ADDIE is a general instructional design process. The letters of ADDIE stand for analysis, design, develop, implement, and evaluate. These are the basic stages that a person or team will go through as they are creating a tutorial, planning a class, or otherwise creating instruction. It looks a little something like this:

Image credit: Wikipedia
ADDIE requires evaluation throughout, so it is not a linear, step-by-step process. Each week for the next 5 weeks, I will look at the different stages of ADDIE in this blog by following a project through the process. Here is a preview of what you will read about every week.

Analyze: determining the audience, format, timeline, etc. Basically, your project planning phase.
Design: writing learning objectives, scripts, and storyboards.
Develop: this is the actual creation of tutorials or instruction.
Implement: rolling the instruction out to the actual users.
Evaluate: assessment of the students; additionally can be used throughout to fix issues in the instruction.

This is a whirlwind overview of ADDIE, but I look forward to going into greater detail about it with you over the coming weeks.

Monday, February 8, 2016

LibGuides Summer Project

Last Friday, I was fit to burst because I found out that my LOEX lightning talk was accepted. If you have not attended a Library Orientation Exchange (LOEX) conference and you are an instructional librarian, you should consider it, since the conference focuses only on library instruction. The tongue-in-cheek title for my 7-minute presentation is "From Garbage to Garden: Composting Instructional Concepts to Improve LibGuides." I picked the idea of composting because the theme of the conference is recycling and repurposing and I felt like the ideas of composting and gardening were better suited to a summery theme. I have written and presented on various themes on this topic a few times already, so in this blog post, I'll give you a run down of what it is (should take you less than 7 minutes to read!) and then let you read my article and view a poster I created on the topic. Without further ado, here's a description:

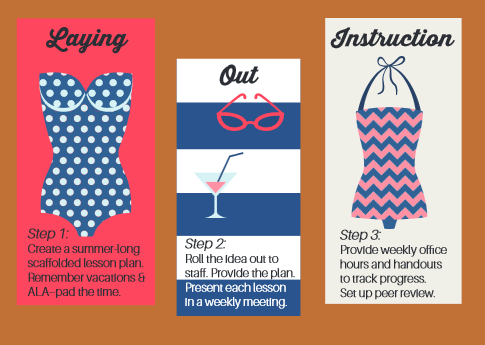
LibGuides--we've all got them. The biggest issue with LibGuides is that almost as soon as we put them on the web, they get out of date. Most librarians make an effort to review course guides when a class comes over for instruction, but subject guides and LibGuides made for classes that have not come over in a while are not updated or overhauled frequently. Since these are on the open web, broken links, out-of-date databases, and other errors can lead patrons to dead ends. Sometimes a cursory glance to make minor changes is OK, but new initiatives can mean a total overhaul of how LibGuides are presented or organized (for instance, a change in catalog, updates to tutorials, and more). Instead of leaving our garbage lying around, librarians can use make use of commonly known instructional concepts to plan a summer-long team project. Some commonly known instructional concepts that are used for the project are scaffolding, modeling, lesson planning, office hours, and peer review. One librarian acts as the organizer of the project by creating a lesson plan at the beginning of summer that lays out the LibGuides updates for the entire summer in two- to three-week increments. In a short departmental meeting, the librarian models the action that needs to be taken during that two-week period by bringing up a LibGuide on the screen and each module builds on the last (scaffolding). Depending on the LibGuides knowledge/tech level of the librarians on your team, you can offer an office hour for people to stop by to get help. By the end of the summer, each individual's LibGuides are updated. From my recent poster, here are the steps:


Image Credit: Katy Kavanagh Webb

Since the project is team-based, everyone on the team is in it together and can help each other, if needed. Peer review also ensures that the work gets done. If you are looking for ideas for updates to include in your LibGuides Summer Project, here are some ideas.

Image Credit: Katy Kavanagh Webb

Want to know more? To read my College and Research Libraries' News article on the LibGuides Summer Project, click here.

To view a poster I presented at the NCLA Biennial Conference about the Summer Project, click here. This is a link to the ECU Institutional Repository, so you will have to click on the PDF at the top to view the poster.

There is a zip file with planning documents if you would like to do this at your own institution here.

Hope to see some of you in Pittsburgh in May! If so, you'll already have an idea of what I am talking about.

Monday, February 1, 2016

Ideas for Supporting Service Learning in a Library

Last week's post was about Service Learning and serving as the client for a class that hopes to be involved in some way with the community. I covered the experiences we have had at Joyner Library with SL classes, and if you need a definition of Service Learning, please go back and see that post. There is another way that the library can be involved with Service Learning--as co-teachers or in an instructional capacity. Admittedly, I have less experience with this realm of support of SL courses. I did see a great presentation at the LOEX Conference in 2015 in Denver on the topic entitled, Where Knowledge Meets Experience: Emphasizing the Library’s Role in an Experiential Learning Initiative bu Elizabeth Price and Rebecca Richardson. I have had some time to digest their presentation and consider it with what I have learned from serving on the Service Learning Committee at ECU. This has led to some possible concrete ways that we as librarians can bring meaning to Service Learning work.

But first, an explanation for the uninitiated. Service Learning courses do not often have traditional research needs. Most of the writing assignments are reflective writing, where the students think about their major, the experiences that they have had, and then write about what they learned and how they feel. For the purposes of this blog post, let's say that the students in our SL class are Nutrition students learning about food deserts. The USDA defines "food deserts" as:

"Food deserts are defined as urban neighborhoods and rural towns without ready access to fresh, healthy, and affordable food. Instead of supermarkets and grocery stores, these communities may have no food access or are served only by fast food restaurants and convenience stores that offer few healthy, affordable food options."

Source: Department of Agriculture, Centers for Disease Control


In our scenario, I will play the part of the instructional librarian that is assisting in this course. Read on to hear some ways I would suggest to support a Service Learning course.

Maps, Data, & Simply Map 
One powerful way to frame the information for a student is to provide maps and other statistical data about the topic. Above, you will see a map with food deserts demarcated on a US Map. Government documents are a great place to get this information, and students tend to be overwhelmed by finding and making use of Gov Docs. Librarians can help. In the case of ECU, we are in Eastern NC, which may not have ready-made maps for topics like food deserts. The product SimplyMap, which is listed in our Database List, can be of great assistance in plotting Census and other data for a particular area. I love this database and suggest that anyone with access to it check it out. I took a moment to record a video of me using this product and I have put the video online here (2 minutes long).

Finding Journal Articles, Encyclopedias, Newspapers, and more
Of course, this is what we are traditionally known for, but there are trade journals, popular periodicals, and other "less scholarly" readings that may be a positive way for students to connect with the material, too.

Suggesting Associations & Businesses
Another way that librarians can help is to assist with research in to professional associations, businesses, and possible clients for a Service Learning class. Put your research skills to use! In the case of food deserts, you could help find a food bank or put students in touch with the USDA or American Nutrition Association.

Serving as an Embedded Librarian to Answer Research-Related Questions
We simply have too many courses to act as an embedded librarian to many of them, but if Service Learning is your interest and you are able to, you could take a more active role as a co-teacher in the course. Bonus points if you get to go along on a trip somewhere!

Here are some ways to get started:
  • Reach out to professors teaching Service Learning courses to offer library services.
  • Learn how to use SimplyMap and how to find government documents online.
  • Get an OrgSync account (if your school uses this product) and see what service opportunities are out there in your community. Consider volunteering on a day of service.
  • Go along with the class to their service location so you can experience what they are doing.